In this seventh part of our Silent Hill 2 Walkthrough, which presents a step-by-step guide to completing the entire game on PS5, including Collectibles, we'll be covering the Labyrinth. This section takes place directly after the Abstract Daddy boss fight, and features a map James fills in himself rather than finding one already completed in the environment.
This Walkthrough is intended for a playthrough where the Combat Challenge and Puzzles Challenge are both set to the Standard option. For more information covering Combat and Puzzles difficulty options, click the link. This page offers a full guide through the location, from the moment you enter until you row across Toluca Lake to the Lake View Hotel.
Note: This page is considered a work in progress as we're still tracking down the last few Collectibles in the game.
Silent Hill 2: Labyrinth Walkthrough - All Collectibles: Strange Photos
After the fight with Abstract Daddy, heal yourself and follow the route back through the building you used to reach Angela in the first place. When you're heading down a corridor, James will automatically bring up the map to indicate you've reached the Labyrinth. However, there's something different about this map: instead of the complete floor plans of the area, James is having to fill in the map himself as he goes along. This will make navigation a lot more difficult and potentially confusing, but stick with us as we make it through the Labyrinth together.
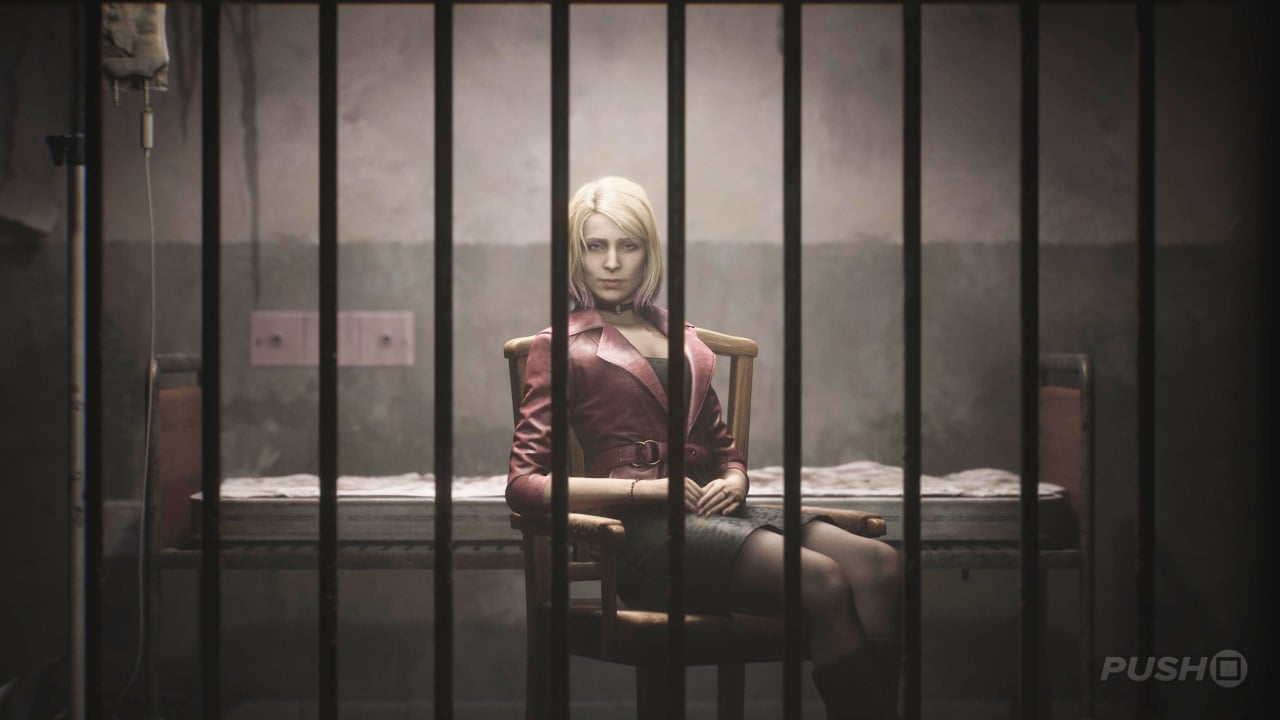
When you round the corner, you'll be greeted by a Strange Wall, which looks to be made out of gigantic bugs, or maybe bodily limbs. You can't pass through it, so head right (make a save if you like) and eventually down two short staircases which take you left. Interacting with the door triggers a cutscene where James finds Maria in a prison cell. Despite the fact she was stabbed by Pyramid Head, she appears completely fine — still breathing, at least.
When you're back in control of James, return to the area with the giant chasm in it from before to discover something has been placed there. You'll discover a Rotating Cube, which controls the building in front of you. Spin it in such a fashion that an open doorway is positioned on your level, where a path automatically shoots out to create a crossing into the structure. To know you have the correct entrance, look for the symbol that's a triangle with an upside-down cross sticking out of it at the bottom. It'll be on the sides of the Rotating Cube itself and above the doorway.
Head inside and take the flights of stairs up to a new, dark corridor that ends with 3 doors. Go through the one on the left and you'll find yourself in the Rotten Area. You'll follow the corridor to a room with a Suspended Cage hanging from the ceiling, which looks like it can be cut down. From this main room, open up your map and take the eastern exit into a series of corridors, which on the left as you're exploring them in-game conclude in a room. Please see the map image below for further context.
In this room, you can move a metal cart up against the wall to reach a crawlspace. On the other side, approach the fridge making a sound for a cutscene in which James finds Lighter Gas.
Retrace your steps back to the main room with the Suspended Cage, and this time take the southern exit. Keep heading south until you hop over a box and go through a set of double doors. Here, pass through the room full of bookcases and squeeze through the gap in the wall at the end of the path. In between the two pieces of broken bedding, James can put his hand inside a hole to find a Lighter Wick.
The corridor out of this room will automatically guide you to a new area, where at a lone desk you can open a drawer to get the Iron Key. This unlocks a door just to the east of the room with the Suspended Cage in it. Open the door and head inside the bathroom, but don't search the bathtub just yet. Instead, head through the gap in the wall and go down the tight corridor to find a valve you can turn. Doing so drains the bathtub, allowing you to grab the Broken Lighter.
Now, in your inventory, combine the Broken Lighter, Lighter Wick, and Lighter Gas together to form a complete Lighter. Return to the Suspended Cage and set the rope alight. The Suspended Cage will drop and create a hole in the floor, which you can jump down.
At the bottom, you'll find yourself back at the Rotating Cube, which must be spun again to find another entrance and path through the structure in front of you. This time, rotate it to where an infinity symbol is displayed above the entrance door, along with a line sticking up vertically with two further lines coming off that vertical one horizontally. Go upstairs inside the structure and follow the corridor down to the same set of 3 doors you encountered previously. This time, head through the middle one straight ahead.
This brings you to the Desolate Area. Make a save, then enter the first door you come to on your right and squeeze through the gap in the wall in the cupboard. Take the supplies in this room and defeat the enemy, then head through the door to the left of the toppled bookcase. Go down the ladder in here to reach the Flooded Level. Follow the linear path of the cave until you pass a hole you can peer into to spot a key. Now, the door to the room up the central path is locked, so instead head south to find a ladder. At the top is the Handcuffed Gate.
Go through the only other door here, and follow the corridor all the way west, turn right, and then right again to find another ladder heading back down. At the bottom, follow the linear cave to the room where you spotted the key through the hole, allowing you to pick up the Small Key. This is used to unlock the Handcuffed Gate. With it gone, you can turn the valve in order to access more of the Desolate Area.
When you reach the room at the end of the new corridor, push the metal cart up against the high crawlspace to pass through. Go down another ladder on the other side to reach a new part of the Flooded Level, with a crawlspace leading you to a wall of Wires blocking the path. Head right into a corridor full of bugs, where Pyramid Head will suddenly show up and give chase. Run left past the ladder and through the next set of double doors to unlock a Trophy, then take the ladder up to another new part of the Desolate Area.
At the top, follow the path to a room with a fuse box you can remove a Wirecutter from. You should now return to the area where Pyramid Head was chasing us and go up the ladder we passed by at first. This brings you up to yet another new part of the Desolate Area, where you'll find ammo, health, and a Strange Photo.
Strange Photo #1: Whole World Ahead of Us
As you're exploring the Desolate Area of the Labyrinth, you'll eventually reach a room where Pyramid Head chases you. On this hexagonal corridor is a ladder you can take up. At the top will be the Strange Photo in the next room along.
Finally, head back to the wall of Wires on the Flooded Level and use the Wirecutter on it. Head through and go down the ladder, then jump down the hole in the little room on the right. For the final time, you'll find yourself back at the Rotating Cube. Spin it so a symbol of an upside-down triangle with a cross sticking out the bottom of it is displayed above the entrance door of the structure ahead. For this last run, go through the red door on the right to enter the Ruined Area.
The ruins of a house will be up first, and when you approach the red door in the back, an alarm will sound and all the nearby enemies will awaken and attack you. Once they're dead, the red door will open and you'll follow a corridor along to another room with the exact same setup as the last one. Defeat the enemies and enter the next room full of bugs. Again, kill all the enemies. For this particular one, you need to shoot at the enemy attacking you from under the metal grating on the floor. The game will be kind to you at this point and provide a save point once they're dead.
When you go down the next hallway and turn a corner, Pyramid Head will reappear after smashing his way through the wall. You need to run away from him in the opposite direction, towards another version of the Strange Wall you saw at the start of the Labyrinth. This one, however, will slowly recede, allowing you to run away. At the end, enter the room to encounter Maria again — but this time a dead one. Leave the cell after the cutscene and you'll be back at the room with the Rotating Cube, except it's been destroyed and Pyramid Head's gigantic sword is sticking out of it.
Interact with the sword and James will drag it along the floor. Carry it to the Strange Wall and you'll be able to pass through it. James will drop the sword when you reach the ladder, letting you climb up to and eventually reach a graveyard. In the back-left corner will be an open grave for James, which you need to jump down. You'll drop down into a corridor, which leads you to a blood-soaked door with Eddie on the other side.
He'll turn on you in the next cutscene, and you'll need to chase after him. In the fridge area with all the animal carcases, the boss fight commences. Eddie has a very powerful revolver that can put you close to death if he lands a clean shot. Use the hanging carcases for cover, and use the Shotgun and Rifle to deal heavy damage. When he shoots the pipes, it'll become a lot harder to see. This sequence is made quite a bit easier if you're wearing headphones because you'll be able to hear the direction Eddie is coming at you from. Follow the sounds to him and continue to blast him with gunfire.
His next move will be to power up the machinery in the room, which makes the animal carcasses move frequently. This makes shooting Eddie at a distance a lot harder, so try to be in close quarters to land your shots when you find him. Having successfully landed a few more shots, Eddie will die and the boss encounter will be over. You can leave the room via a set of industrial doors on the perimeter of the fridge.
Leave the building and you'll come outside to a view of Toluca Lake. Make a save, then approach the boat at the end of the pier. On the water, you need to row towards the light off in the distance. If you set your controller down and simply have James spend 10 minutes out on Toluca Lake, you'll unlock a Trophy. You'll eventually row across to the Lakeview Hotel, where our Silent Hill 2 Walkthrough concludes.
Did you find our Walkthrough covering the Labyrinth in Silent Hill 2 and all its Collectibles useful? Our Silent Hill 2 Walkthrough continues in our Lakeview Hotel Walkthrough, and we have even more guidance and information in our overall Silent Hill 2 guide.


Comments 0
Wow, no comments yet... why not be the first?
Leave A Comment
Hold on there, you need to login to post a comment...